WIP
Ooh, it’s good to be building another mecha girl after spending all of October not doing so. This is the Frame Arms Girl Durga I Darkness Queen, and damn this was quite a snap build. Right away, getting all the runners out of the box took forever because she comes with so many, albeit very small ones, but by the time I sorted the runners out, it took up the entire table (comparison with Kongo’s runners) I was quite overwhelmed, the build is indeed lengthy, and she’s quite the fixer upper, yet, I still had an enjoyable time compared to the mental beatdown that was called Yefuna Malkina.
Starting with her base body: u/Loli-Knight I feel your pain with Durga’s hair, it’s incredibly sharp. Right away, Durga comes with a problem that becomes consistent throughout the entire assembly—everything fits either too tight or too loose, without any connection feeling just right. I either had to sand down pegs as I didn’t want the part cracking on me later on, or put on some sticky tack to make a connection tighter. However, some of the parts that I did sand ended up being a problem itself later on once I started layering her up, which now I’m gonna have to tighten some areas that I sanded so that can be more stable standing and holding her heavy weapons. However, I’ve been dealing with this problem so much that I don’t really complain anymore; most of these problems can be fixed, so I fix them on the spot, and I move on. Anyway, for Durga’s base body, despite the amount of sanding I needed to do to fix her, she’s able to stand despite wearing heels. She’s got a fully exposed midriff, which is sculpted very nicely, and of course she got that cake, which that + her smug ass face on, it’s got me feeling something
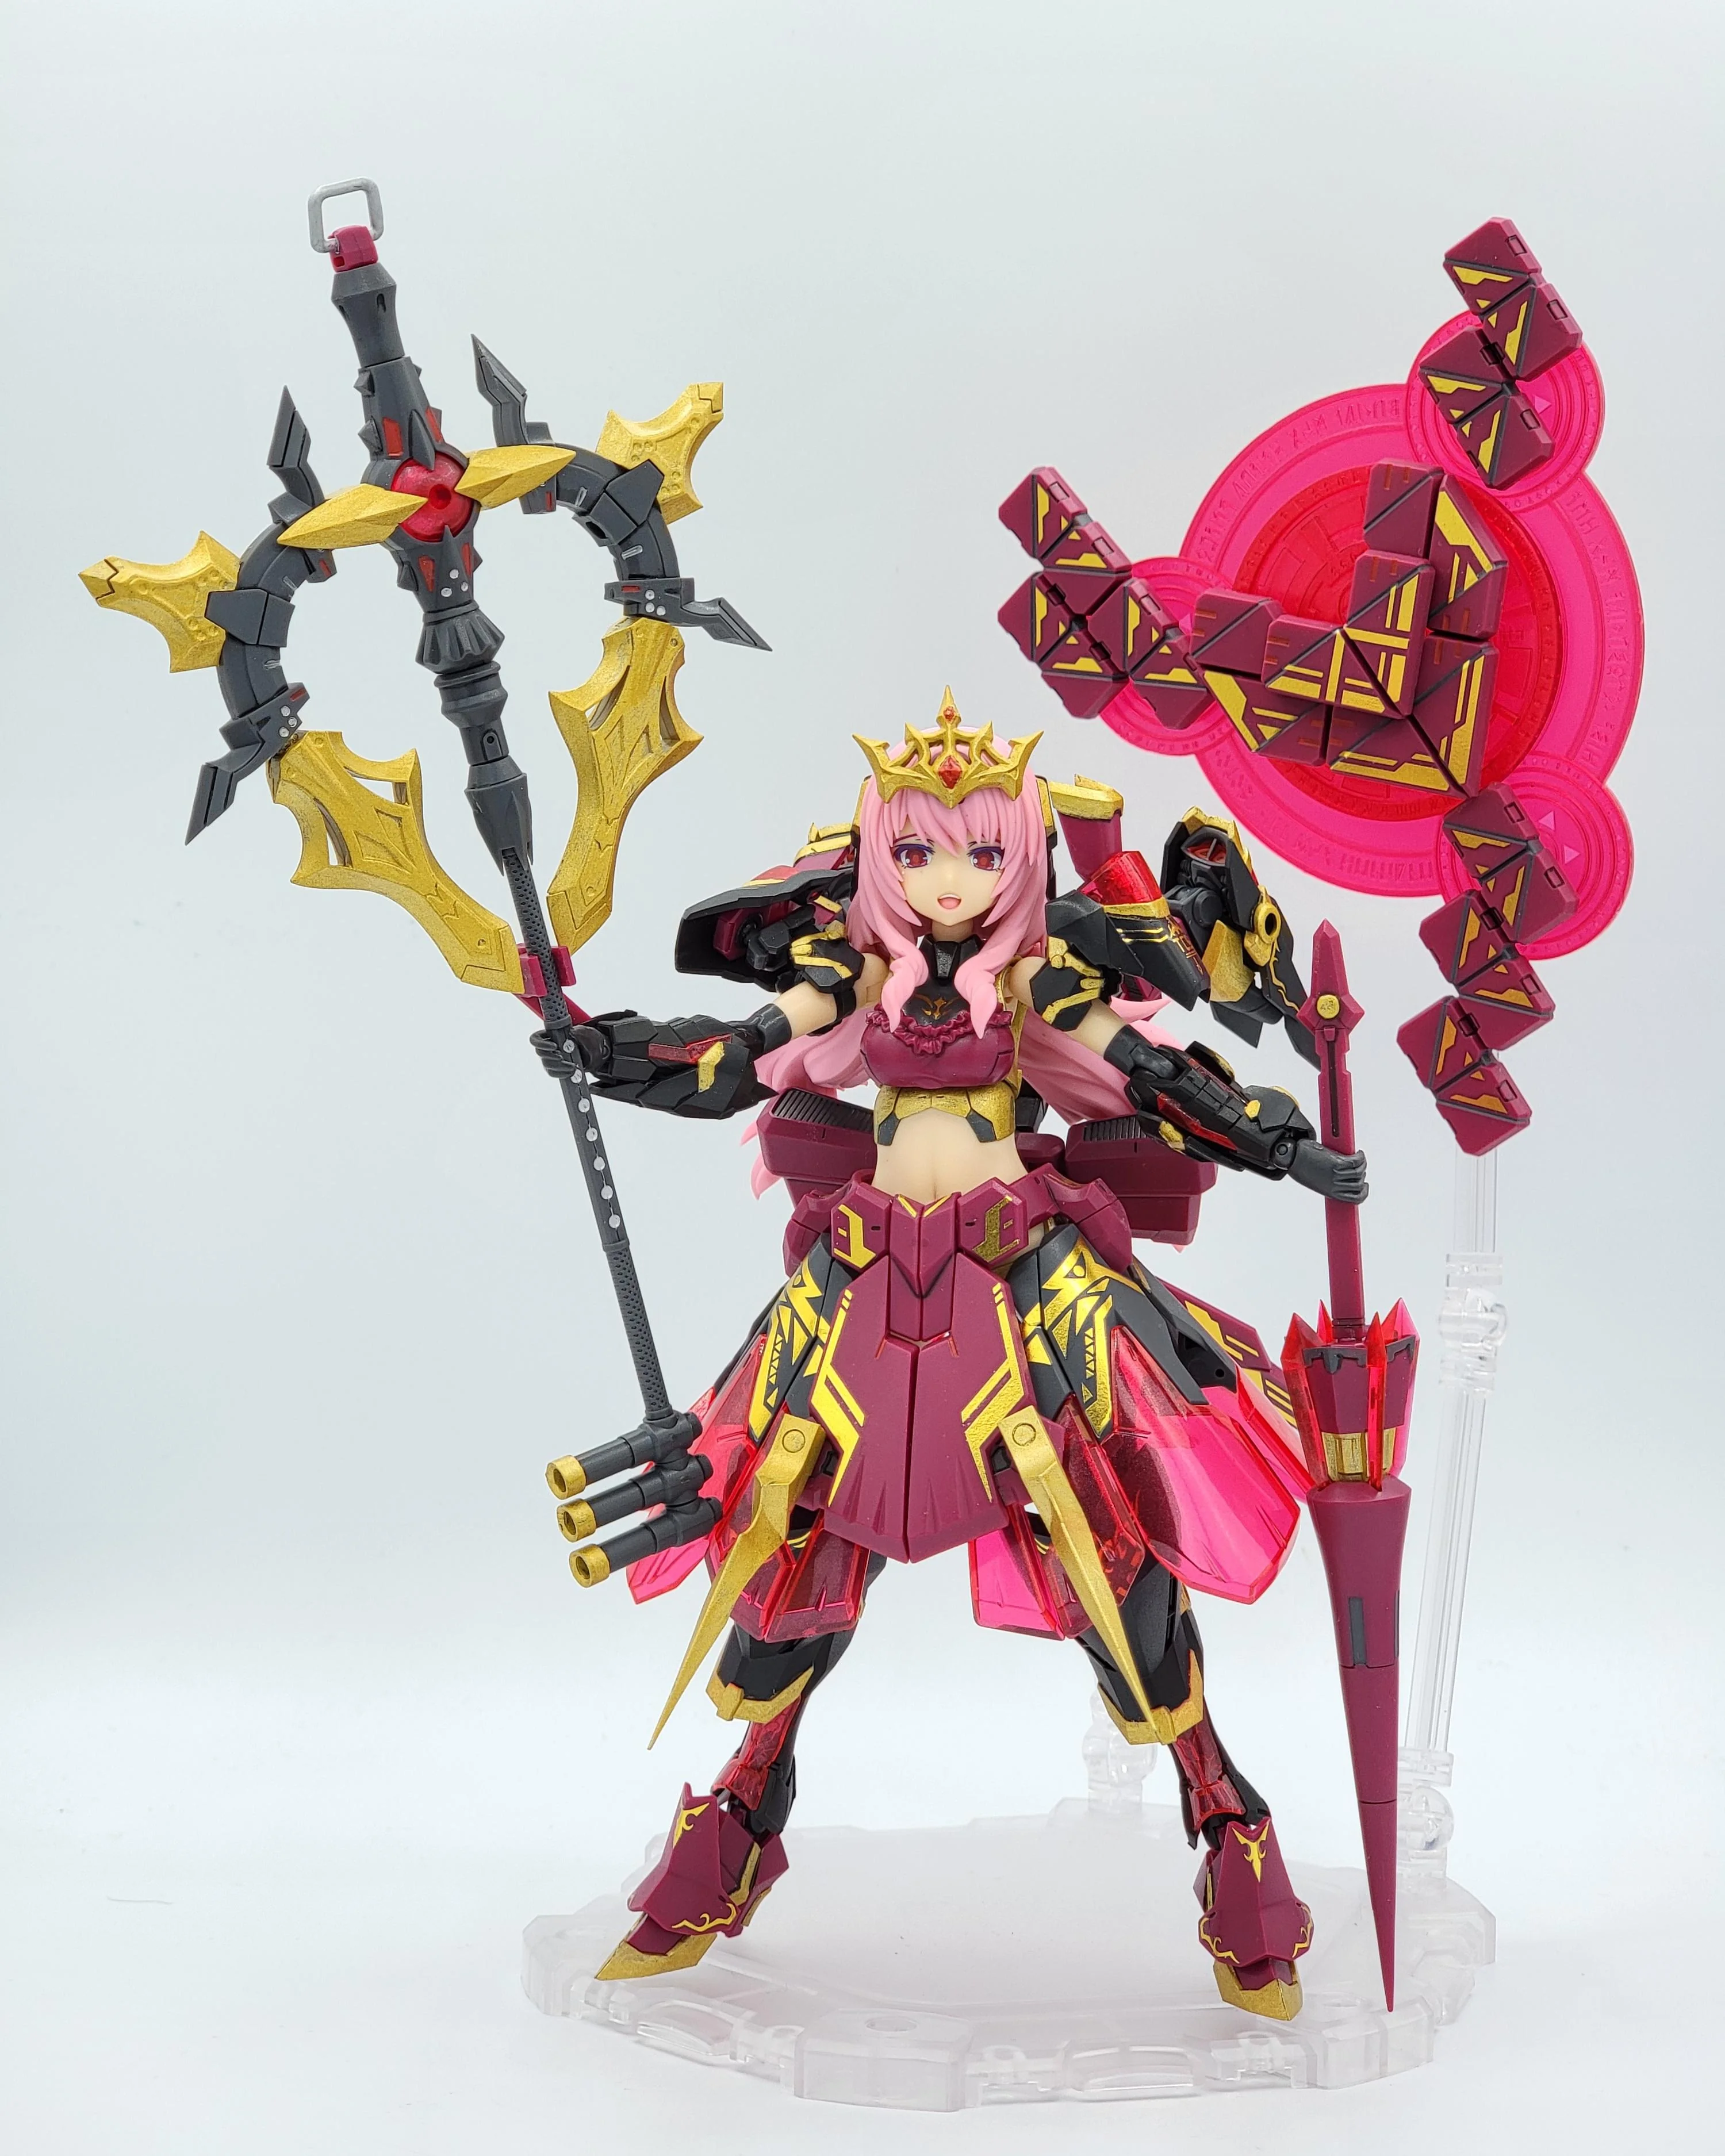
Next up I built her big skirt, which luckily hides her cheeks, which, after just tightening up the side skirt connections, it’s pretty much the most solid part of the kit. Connect it through her back, join the front skirts together, the skirt goes nowhere, and I finally have a mecha girl wearing something over her crotch for once. I skipped the weapons, then built her knight armor, which looks great on its own, but that skirt ain’t doing much covering her up, so I put the big ol’ skirt on top of her knight form, which she started to look busy. I decided to ditch her armored chest as I wanted to show her belly, which that’s the configuration I’m going for once she’s all done.
It was finally time to put on her weapons, and jeez, they’re heavy. The spear can be held just fine, you don’t even need the support that connects directly to her arm. It will be needed for her staff because it is huuge, basically being as tall as her. Fortunately, the connection of the staff, her hand and the support arm is surprisingly solid, but the weight makes her shoulder suffer instead. I decided to combine her staff and her spear, which looks really cool, but it now causes her entire upper half to sag, which, damn does that say something about the monstrosity of the combination. I finally built her shield, which the way it’s built is very unique, but goddammit with the beam(?) effect behind the shield, it creates interference with the shoulder armor, and having her hold her spear on the left arm, now the left shoulder is suffering.
Finally, since I didn’t want to wait to buy a display stand for Durga, I went and scoured for spare Nuke Matrix stand parts, which I was able to find a lot of arms to display her giant magic circle and even the small shield bits which I just connected all 8 of them into one. The way I got her currently displayed justifies the price I paid for her. OOB, the Darkness Queen looks really good, but holy shit is there a lot of missing gold. I do have a gold paint to fix this, buut, it doesn’t exactly match the “gold” plastic, so I’m going all out—I’m hand-fucking-painting all of the gold. This will be quite difficult where I have to color correct, but, on the mustard gold parts, I should be fine; I already tested hand painting in a gold and black area. But overall, this was quite a fun build, and frankly, I’m kinda excited to paint the gold. I have a long way ahead of me. If I manage to stay sane by the end of this, I might consider getting another Durga kit. Alright, this was a long post, hope you enjoyed reading, and I’ll see you… well, this is gonna take a while, so… I’ll see you then!
Completed
Durga is finally complete and what an incredible journey this was. This took longer than expected, but it’s not what you might think.
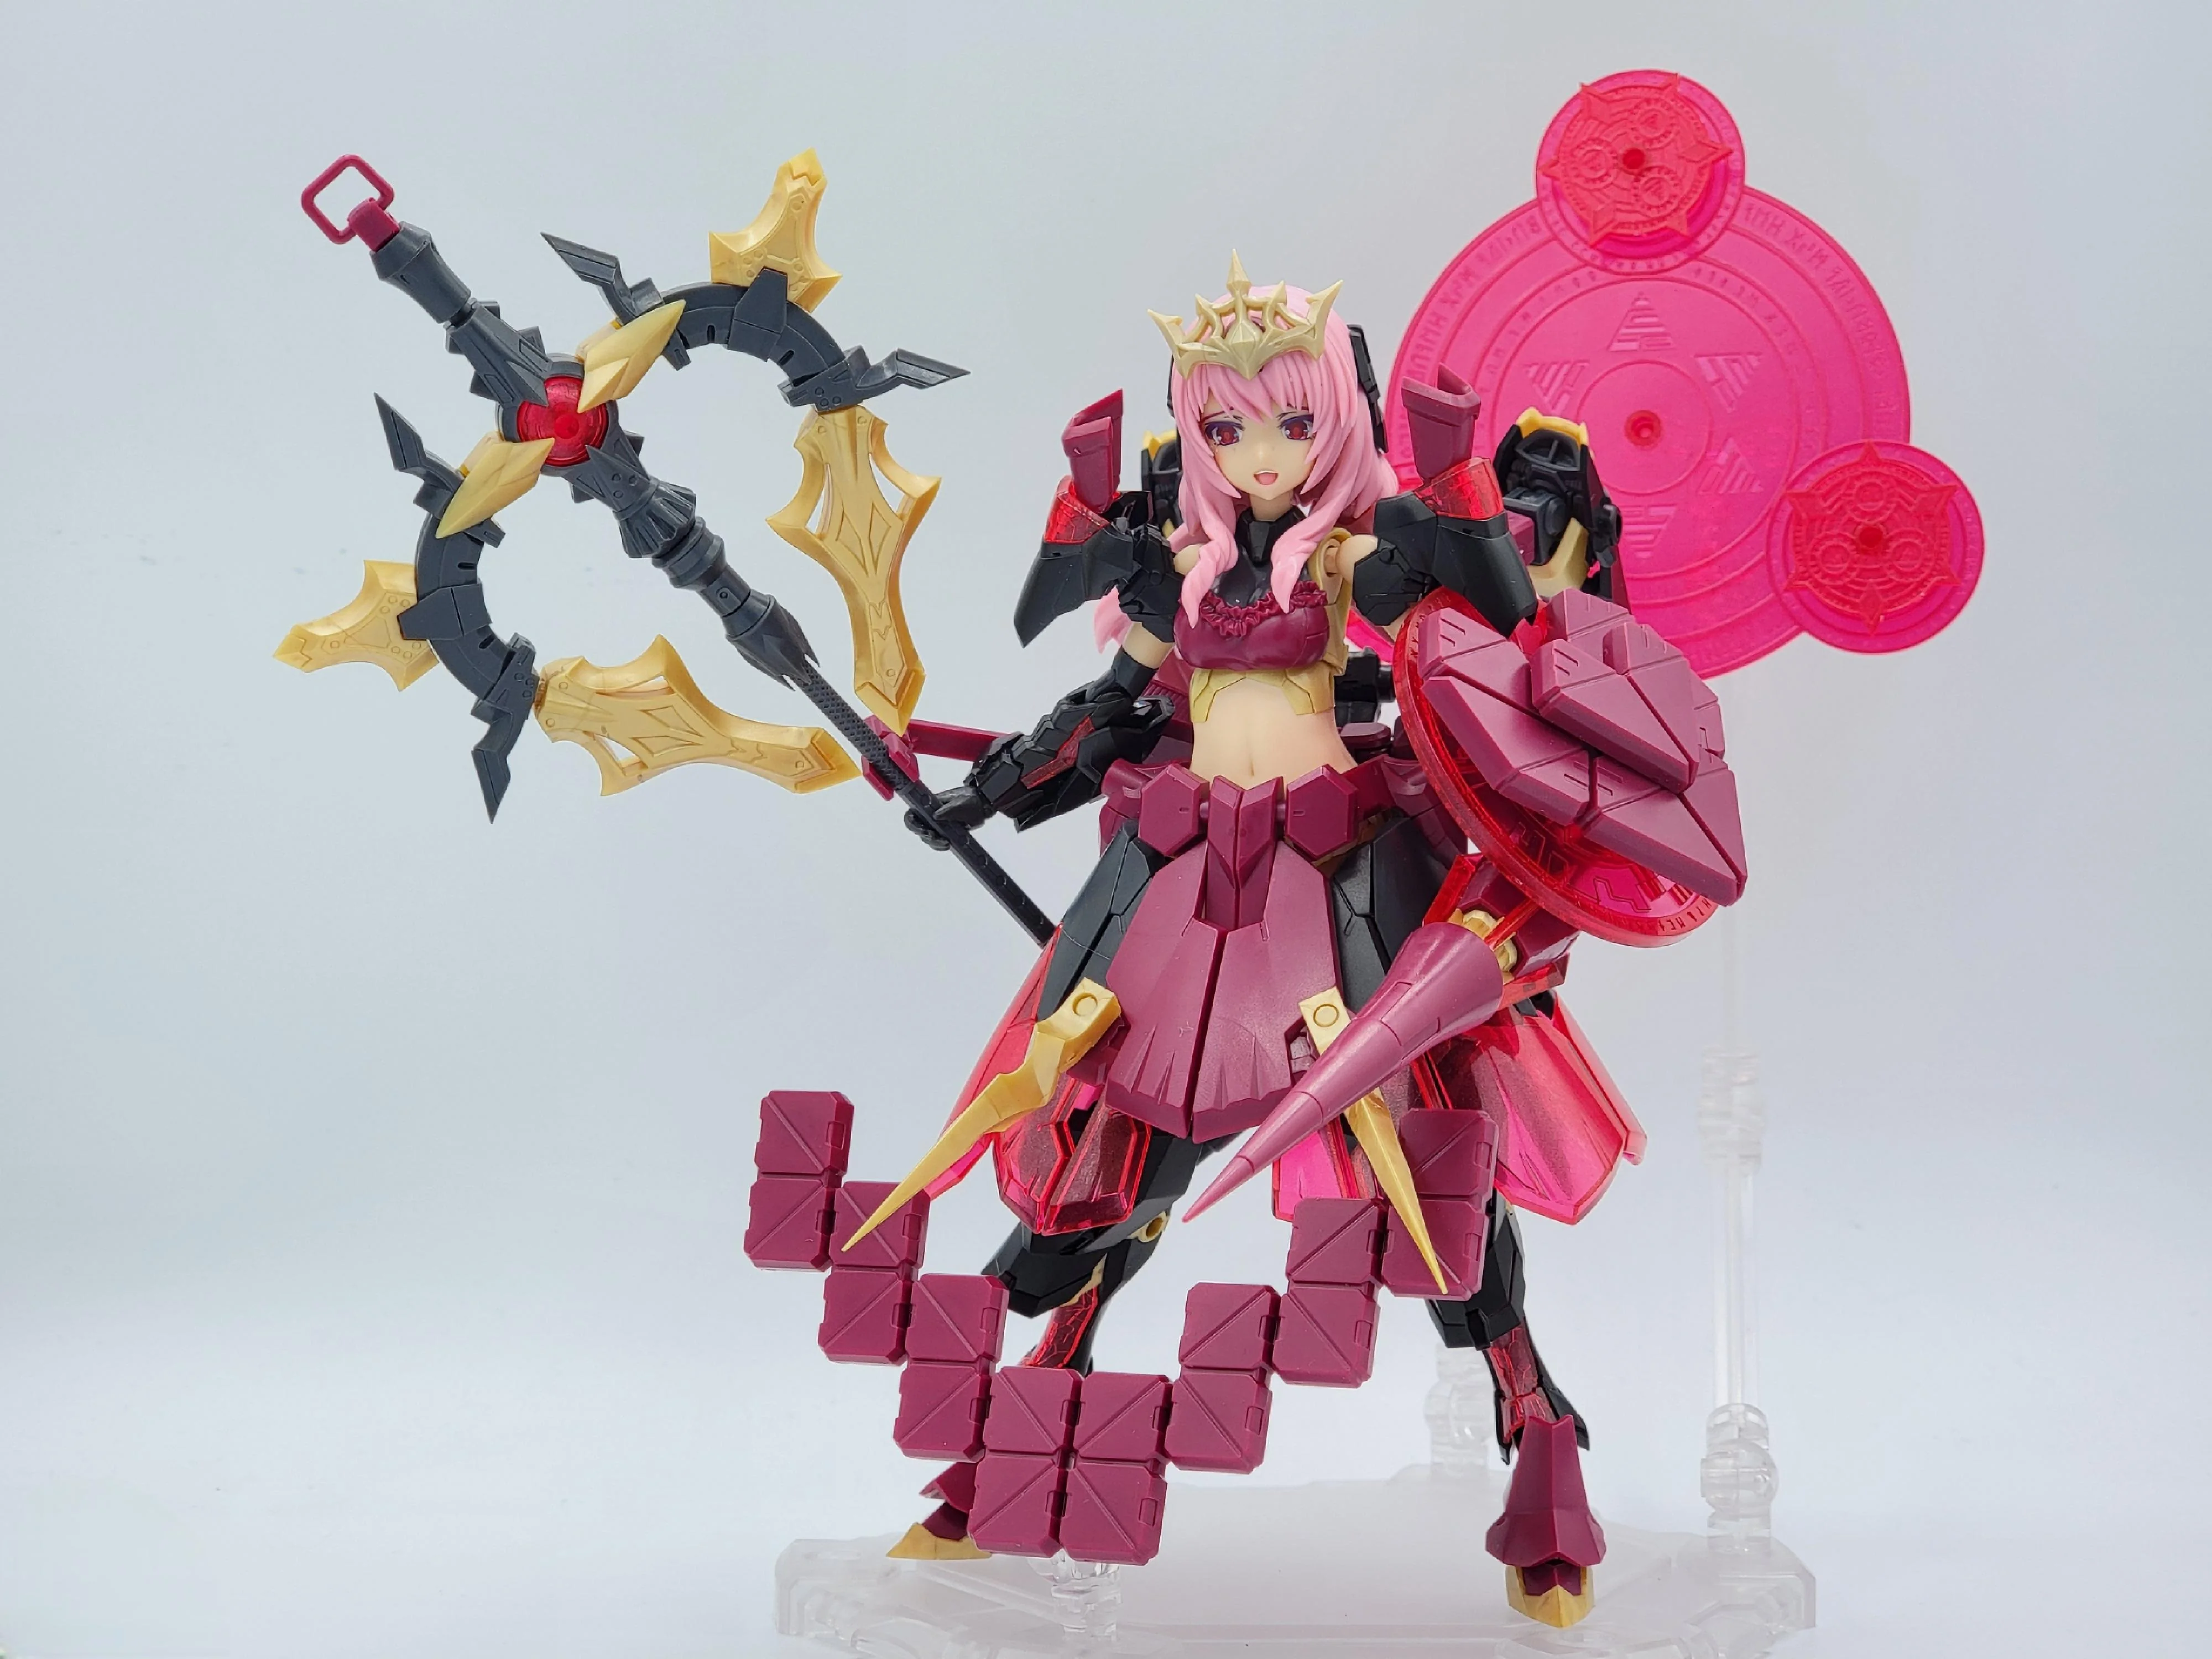
This was the first time I ever hand painted an entire color differently, that being the terrible injected gold into Tamiya Gold Leaf so I could be consistent with the plastic and massive amounts of color correcting I had to do throughout the kit. The painting would have either break and make the experience for me, but jolly, it was very fun. Hand painting the “gold” plastic was the easy part, I just got a huge brush and painted over the plastic, though I did give it a second coat just to make it more consistent. The real obstacle was painting on the black plastic, until it wasn’t because most of the areas where you do need to paint are very defined and cleaning up the excess paint could just be solved by hiding it with a black panel liner. The trickiest part is undoubtedly Durga’s shoulder armor, but of course I used a finer paint brush for that. As you might see though, since I wasn’t going to use it anyway, I did not even attempt painting the gold in Durga’s armored chestpiece.
However, after doing the gold, there wasn’t really anywhere much to do extra painting. I did attempt to paint the red string that holds the ruffle socks, it’s… alright, but nobody’s ever gonna see it. I did add gray where it was missing OOB and on the panel lines of the shield bits and… uhh extra armor bits(?), dabbled a bit more red in a few places, stole UNOYO’s idea of adding clear red on the crown jewels, and spiced up the weapons ever so slightly.
Then, with a dying panel line marker, I did panel line the few lines that existed… but then it was time to decal.
I followed u/Loli-Knight’s advice to try Kotobukiya’s decals… and miserably fucked up from the very start. I first added the decals on the parts I was going to use… and they were not bad at all. They take flipping forever to slide from the decal sheet, but they’re not as easy to tear and stick off like Bandai’s waterslides. So, I decided to try one of the major decals on the skirt. I was able to stick it on… buuuuuut it was just misaligned ever so slightly, being an idiot I am, I used the mark setter to wet it up (most decals start sliding again, I know it’s bad practice), and the decal shriveled up… it was beyond repair. At that point, I just couldn’t use the Kotobukiya decals anymore as I was expecting a third party decal sheet to come over, and there was no way the decals would match each other, and the difference would stick out as it was right front and center. Other problem was, the third-party decals were expected to be delivered within a week. So, for 4 days, I was stuck doing absolutely nothing. The decals, as I expected, did come earlier though, and as I also expected, the decal quality was different from the official ones. Getting the only set that existed, the decals were much more reflective and the print quality was definitely lower, but it kinda worked in my favor as it kinda resembles the finished gold look, which you can tell it was hand painted when you look close enough. These decals took much less time to get off the sheet, as much as it looks like it can rip off and none of them ever broke on me, if they did, each and every decal came with a spare. However, I’m not sure if this was a problem with the official ones, but they had fitment issues, and trying to stick the ones that covered a sharp degree angle was infuriating, but I still managed to get the job done. My only gripe was that the decals were super reflective, meaning only on a certain angle would it match with the painted gold.
Finally, it was time to topcoat, and Jesus Christ was there so many things to coat. I pretty much coated everything but the clear red and her faceplates, but it was definitely the cherry on top. It also fixed my decal problem, thank fuck. So, how did she pose?
Durga’s base form is as great to pose as ever, especially with her open smiley face. Thank the lord that her cheeks are hidden for the rest of the build. Onto her Darkness Queen form, yeah, her legs couldn’t bare the weight of the accessories anymore. Her key staff is just really heavy, but I did put some double sided tape on her arm connection, and it helped considerably. But the real showrunner was her final form, which I’m dubbing “Dark Empress”—basically her Darkness Queen form with the majority of her armored pieces. I used spare Nuke Matrix base parts to stand her up and freed her left arm by incorporating a very cool shield form that uses the shield, the giant effect part and the extra armor bits combined and it’s really adds a lot. The gold of the armor bits and the gold decals just pop off like jewelry. Utilizing everything really makes Durga worth the $120 I spent for her. While she was no exhaustion like Yefuna Malkina (building and posing wise) or Kongo (detailing wise), she’ll grab more eyes than either of them. This truly was an amazing kit, and I’m definitely getting another Durga in the foreseeable future.
For what’s to come next… I’ll be finally building a kit from the line that the subreddit’s name is based off of. Next up, will finally be my very first Megami Device
However, I am going to AnimeNYC this weekend; if she’s there… I’ll be definitely grabbing Amaterasu to pair her up with Susanowo